Chapter 6
How to set up enhanced board views in Trello enterprise
Trello Enterprise offers more than just the standard Board view. Enhanced views give you a new perspective on work to be done and support better decision-making.
Section Overview
In this section you will learn:
How to change views
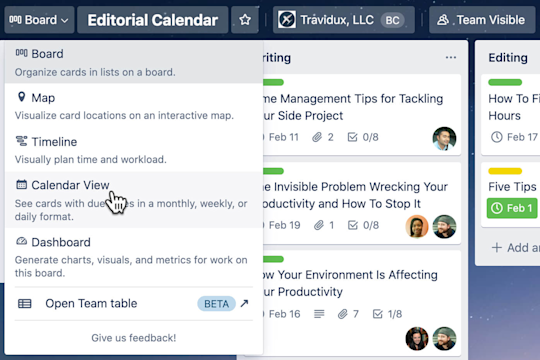
Change up your view by selecting the Board drop-down in the top-left corner of your Trello board and selecting your desired view from the drop-down.
Timeline view
With Timeline View, get a clear overview of work based on defined start and end dates. Glimpsing work from this view allows you to better assess a project pipeline and identify upcoming blockers.
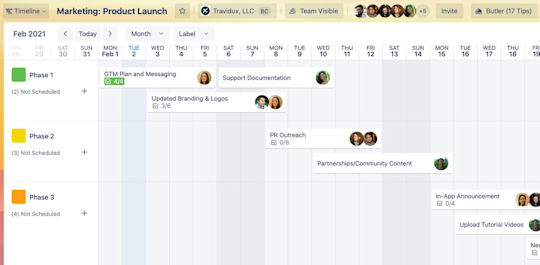
Cards organize by start and due date. By default, cards group by list into horizontal lanes. You can adjust lane grouping (list, member, label) and time frame (day, week, month, quarter) from the drop-down lists at the top of the view. You can hop directly into a card by selecting it from the timeline.
Using Timeline View, you can
- view members assigned to a specific task;
- sort tasks by their label or list;
- add new project tasks and specify start and end dates; and
- adjust dates by dragging and dropping a specific task.
Here are a couple of examples of how you can use Timeline View:
- Communicate how long a task might take. Adjust dates for a task to reflect how long you think a task might take you to complete. This helps coworkers with tasks that depend on yours to adjust their workload. It can also signal to your team lead that they need to assign another team member to help you to meet an earlier due date.
- Monitor workload distribution. Apply the member grouping to lanes and view upcoming tasks for each of your team members. Quickly see overlapping tasks, gaps in work, and opportunities to shift or redistribute assignments.
Calendar view
With Calendar View, see all of your board’s cards with start dates, due dates, and Advanced Checklist items with due dates. Calendar View displays both full-day and multi-day events.
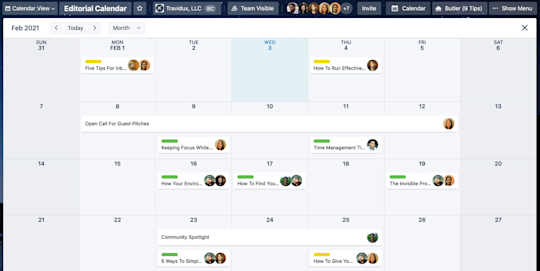
Cards organize by their due date and display any labels, members, and checklists added to them. Add a new card from this view by selecting Add card in the bottom-left corner of the calendar. You can hop directly into a card by selecting it from the calendar.
Using Calendar View, you can
- add start and end dates to tasks and get a clear vision of what work lies ahead;
- quickly switch between week and month views for a more specific or broader view of cards; and
- adjust dates by dragging and dropping a specific task.
Here are a couple of examples of how you can use Calendar View:
- Manage interviews in a hiring pipeline. Create a card for each candidate, attach their resume, interview questions, and a Zoom link. Use Calendar View to ensure dates and interviewer assignments don’t conflict.
- Track sales deals in the works. Stay on top of follow-up communications, contract tasks and dates, and important deadlines in a prospective-to-customer deal.
Dashboard view
With Dashboard View, visualize key metrics like due dates, assigned cards, and cards per list. Trello starts you with four panels, but you can create additional panels and change the visualization type.
To add a new panel, select the plus sign at the bottom of the dashboard. Select your desired visualization type (bar graph, pie chart, or line chart) and the metric you wish to see (cards per list, cards per label, cards per member, and cards per due date).
Edit existing visualizations by selecting the graph and choosing an alternate visualization type.
Using Dashboard View, you can
- add, remove, and edit dashboard tiles using a wizard that customizes visualizations based on several data points;
- click into a chart to view a breakdown of the specific cards included in the figure; and
- export a dashboard for easy presentation to leadership or other stakeholders.
Table view
With Table View, view cards across multiple boards in one centralized location. It’s a crucial view when understanding workload distribution and potential bottlenecks across various projects.
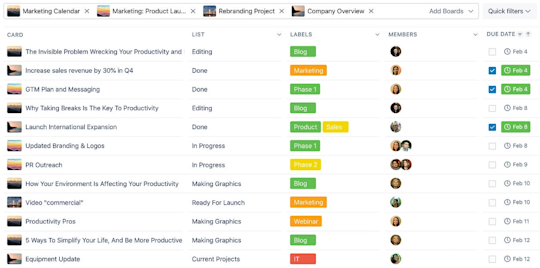
Select a board (or multiple boards) from the Add Boards drop-down to populate the table with cards. Use the Quick Filters drop-down to the right of the board field to filter cards, or select the header of each column to refine results.
Share a specific filtered view with a coworker (or bookmark it for later use) by selecting the Bookmark button. Copy the link provided and share.
Using Table View, you can
- view cards from multiple boards across a team’s workspace;
- filter cards by lists, labels, members, and due dates;
- share or bookmark a custom view; and
- easily keep track of team member workload.
Here are a couple of examples of how you can use Table View:
- Keep tabs on cross-functional collaboration. Let marketing and product teams design their boards and workflows but pull together tasks and projects in a single view to understand better how dependencies and due dates line up.
- Manage workload across boards. Bring together all cards assigned to a specific team member who collaborates on multiple boards within a Workspace. It’s the ultimate view for a team lead to get a big-picture understanding of team member bandwidth and potential for burnout.
Map view
With Map View, add locations to cards and visualize them geographically on a map. Trello Map View uses Google Maps.
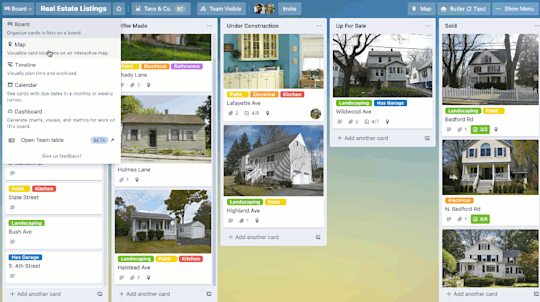
Add a location to a card in your standard board view by selecting Location on the right side of the card back, or create a card directly from your map by selecting Add a card in the top-right corner of the map.
Using Map View, you can
- move around the map with drag and drop functionality and zoom into specific territories, locations, and regions;
- add new cards by location; and
- access card details by clicking into existing locations.
Here are a couple of examples of how you can use Map View:
- Keep track of events across cities and states. Planning to attend industry trade shows or host regional customer conferences? Keep track of venue or location details so every team member is on the same page when it comes to where they should be and when.
- Manage project sites. Architecture firms or contractors can easily track job sites, vendors, and project progress across multiple locations.
Now that you’ve met all of Trello Enterprise’s enhanced (and work-changing) views, you’re ready to dive deeper into the many ways Trello lets you bring your personality to work.