Chapter 2
How to create Trello projects and invite members
Trello boards are the perfect way to connect and collaborate on work no matter where you’re located. From creating a board to adding new members to collaborate on tasks, Trello makes every step a piece of cake.
Section Overview
In this section you will learn:
Create a board from scratch or from a template
Every board belongs to a Workspace. You can add a new board from the Workspace home, or any time (and from any board) by selecting the plus sign in the top-right corner of Trello.
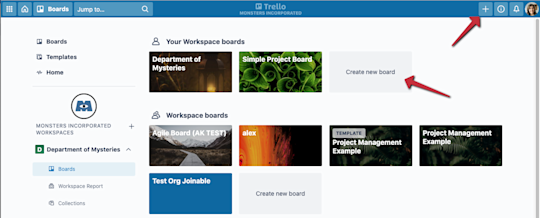
If you already know how you want to organize your board, great! But if you need a jump-start, you can choose a template from Trello’s extensive template gallery. Search by name or check out templates based on department or category.

There are so many ways to be productive with Trello templates, but here are a few popular uses:
- Create a project board. Turn big dreams turn into even bigger results with a killer project plan.
- Run a team meeting. Collaborate with your team on the agenda for a regular, recurring team meeting.
- Share a resource hub. Centralize essential resources, schedules, project summaries, and updates. This makes information easy to locate, access, and share.
Invite members to collaborate
Once you create a board, invite members to collaborate. You can invite users from the same team or another team—Trello’s a huge fan of cross-team collaboration.
Note
Workspace settings may restrict board invitations to Board Admins only. Reach out to your Board Admin if you have difficulty inviting users to a board.
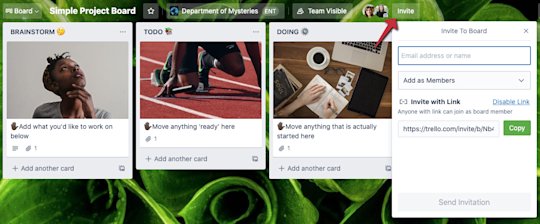
Select Invite at the top of the board. You can choose to invite additional users by
- Name
- @-mention
- Or you can create an easy-to-share invite link that’s perfect for dropping in a Slack channel or emailing to external stakeholders who want to collaborate.
Set membership permissions
Membership permissions ensure each member has the correct level of access and control. You can define permissions when inviting members to the board using the Add as Members drop-down.
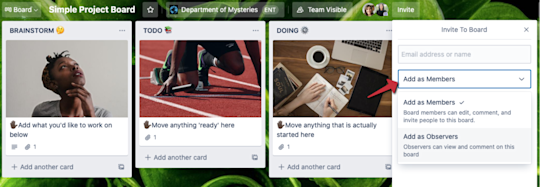
- Members can view and edit cards. Great for team members actively working on a project.
- Observers can access information view, comment, or vote on the content within a board, but they can’t edit cards, enable power-ups, or add lists.
Inviting someone outside your Enterprise?
Licensed team members can be added to boards within your Trello Enterprise instance. However, to add external guests such as contractors or agencies, you will need to grant your guest their own license, make them an observer with limited editing rights, or make your board public. These permissions may be allowed or not allowed depending on our IT Team / Enterprise Admin’s settings.
Define your lists and cards
Lists help you organize cards vertically. They can represent different ways to organize ideas or tasks within a larger project, such as lists for “to-do, in-progress, done” in a project flow.
Select Add a list to add your first list to your board. Give it a name that represents the stage or information it will hold. Examples include “To Do,” “Doing, ” and “Done.” You can add as many lists as you need to build out a workflow that works for you.
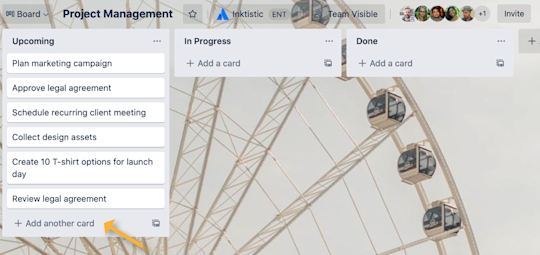
Once you’ve created lists, you can start adding cards. Select Add a card from any list and add a card description. Add as many cards as you need, and archive cards once you no longer need them. Move cards by simply dragging and dropping them across lists.
Collaborate in cards
Collaboration happens at the card level. Here, you and your team members can take advantage of checklists, due dates, attachments, and more to level up each task.
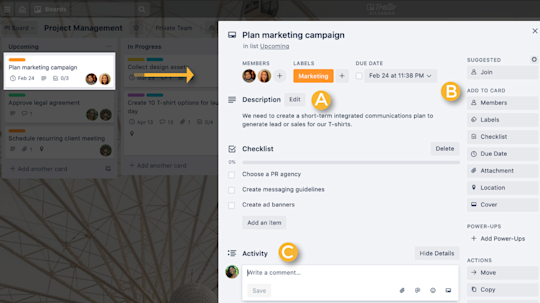
Card Descriptions (A)
Descriptions allow you to expand upon the card title. Select Edit to add high level overviews, observations, mission statements or goals of the card - perhaps even quick links or a few sentences of context for team members collaborating on the task, or those simply checking in.
Add Options (B)
Add to Card options appear on the right-hand side of the card back. Here you can assign members to a task, create checklists, and add important due dates. Other options include enabling Power-Ups and automations and attaching files from Dropbox, Google Drive, or a personal device.
Pro Tip
Enterprise Admins can set controls on what type of attachments members can add to tasks. Learn more here by scrolling down to “Attachment Restrictions”.
Comments and Activity (C)
Collaboration comes alive in the card activity feed. Here you can give feedback, ask questions, and provide updates. Easily @ mention team members in a comment and send a notification to that team member. Emoji reactions also provide a fun way to react and celebrate activities.
Now that you’ve mastered board-level collaboration, it’s time to learn about Workspaces: your teams’ digital office.