Chapter 5
Advanced Trello features - automations, checklists and more
Butler is Trello’s answer to automation. With Trello Enterprise, teams can create unlimited rules and schedule commands that perform different actions on the board.
Section Overview
In this section you will learn:
Why use Butler?
Butler’s versatility makes it a valuable tool for your boards. Here’s why:
- Butler saves you time and effort by automating repetitive tasks.
- Butler remains consistent, performing the same tasks under the same circumstances each time.
- Butler keeps your board tidy by running maintenance tasks periodically.
Get started with Butler
Butler makes it easy for anyone to automate just about any action on a Trello board. Its simple native language system requires no coding, and you can set up any automation in seconds.
To get started, select Automation in the top bar of your board.
Butler offers five different automation types:
- Rules
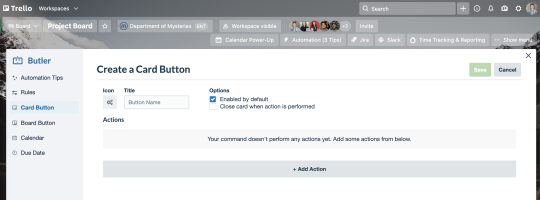
- Card buttons
- Board buttons
- Calendar commands
- Due date commands
Each type is explained in further detail below.
Pro tip
Butler automatically detects repetitive actions you take on a board and will suggest them as quick-add automations. You can locate suggested automations in the Automation Tips section of your Butler hub.
Build a rule automation
Rules contain two parts: a trigger and a resulting action. You can customize both parts of a rule and include more than one resulting action.
Select Rules from the side menu. Here you can view, edit, copy, or delete existing rules. To create a new rule, select Create Rule in the top-right corner.
Start by defining your trigger. This is the inciting action that prompts the command to run. A trigger can be moving a card to a new list, adding a label, marking a task complete, checking off items on a checklist, etc.
Once you have defined your trigger, select the green plus sign on the far-right of the trigger to add it to the rule.

Next, define the resulting action, or what you want Butler to do when the trigger occurs. Resulting actions can be moving a card, assigning or removing members, setting a due date, etc.
Once you have defined your resulting action, select the green plus sign on the right action to add it to the rule. You can define more than one resulting action (ex: “move card to Done” and “remove me from the card”).
Select Save in the top-right corner to save your new rule.
Here are a couple of examples of useful rules:
Surface urgent tasks.
- Trigger: When a team member labels a card “Urgent,”
- Actions: Move the card to the top of the list, send the card to the board Slack channel with the message “Can someone take this?” and add a due date for three days from now.
Completing a task.
- Trigger: When a team member completes a checklist,
- Actions: Mark the due date as complete, move the card to “Done” list, and @ mention team lead “All done!”
Set up calendar and due date commands
Tap Butler to help create recurring events and remind you of important due dates using calendar and due date commands.
Calendar commands
Calendar commands automate recurring tasks and regular board maintenance actions, like creating recurring events or archiving completed cards. You can set these commands to run at specific intervals, like daily, weekly, monthly, and annually.
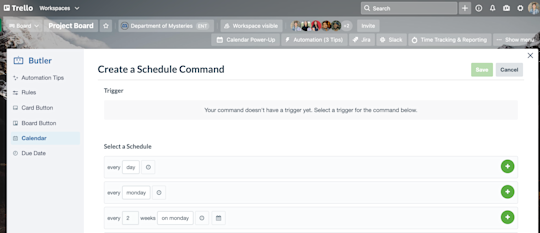
Select Calendar from the side menu. Here you can view, edit, copy, or delete existing calendar commands. To create a new command, select Create Command in the top-right corner.
Start by defining your trigger. For a calendar command, your trigger is an interval, like “every day” or “the first Tuesday of every month.”
Once you have defined your interval, select the green plus sign on the far-right of the trigger to add it to the command.

Next, define the resulting action or what you want Butler to do at the specified interval. Resulting actions can be creating a recurring card, moving a card, or archiving completed cards.
Once you have defined your resulting action, select the green plus sign on the far-right of the trigger to add it to the command.
Select Save in the top-right corner to save your new calendar command.
Here are a couple of examples of useful calendar commands:
Perform weekly board maintenance.
- Calendar interval: Every Friday at 5 p.m.,
- Action: Archive all of the cards in the “Done” list, move the cards from the “Next Sprint” list to the “To Do” list, and sort all cards in the “Doing” list by their due date.
Create cards for recurring 1:1s or meetings.
- Calendar interval: Every Monday at 7 a.m.,
- Action: Create a new card in the “To Do” list titled “Create weekly meeting agenda."
Due date commands
Due date commands use a card’s due date as a trigger. Program actions to occur as a card’s due date gets closer, the moment it is due, or a set period of time after a card is due.
Select Due Date from the side menu. Here you can view, edit, copy, or delete existing due date commands. To create a new command, select Create Command in the top-right corner.
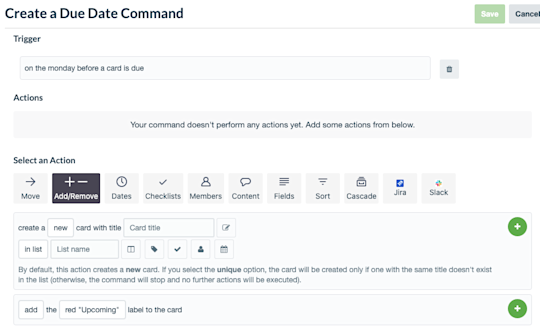
Start by defining your trigger. For a due date command, your trigger is an interval related to a due date, like “two days before a card is due” or “the Monday before a card is due.”
Once you have defined your interval, select the green plus sign on the far-right of the trigger to add it to the command.

Next, define the resulting action or what you want Butler to do at the specified interval. Resulting actions can be creating a recurring card, moving a card, or archiving completed cards.
Once you have defined your resulting action, select the green plus sign on the far-right of the trigger to add it to the command.

Select Save in the top-right corner to save your new due date command.
Here are a couple of examples of useful due date commands:
Remind your team of upcoming due dates.
- Due date status: Two days before a card is due,
- Action: Move the card to the “Home Stretch” list and add the yellow label to the card.
Flag an overdue card.
- Due date status: The moment a card is due,
- Action: Move the card to the top of its list, add the red label to the card, and post a comment “@card What’s the status of this?”
Note
Due date commands are not retroactive. Commands only apply to due dates created after you create a due date command. If you create a command to flag cards due in two days, it won’t flag cards currently due in two days.
Integrate Butler with email and other apps
Take Butler beyond your board by tapping into existing integrations with Slack, Jira, and email. This makes it super easy to automatically share information and updates with external stakeholders, clients, or coworkers.
Slack
Keep everyone in the loop by posting to a specific Slack channel with important updates from your Trello board.
For example, you can create a recurring calendar command that at the 1st of the month creates a new card in the “To Do” list titled “Pick team lunch location.” Add an additional Slack action that posts a message in the team’s Slack channel asking for eatery recommendations.
Jira
Trello’s Jira integration is a perfect solution when you track work in Trello, and a coworker tracks their work in Jira. For example, say you just finished drafting release notes for an upcoming software release. You need to get the notes to the development team to ensure they get published. But developers aren’t in Trello—they use Jira.
You could create a card button called “Ready for Dev” that creates a new Jira issue titled “Release Notes Ready.” The Jira issue links to the release notes draft, allowing the dev team to access the file for future publication easily.
Automatic emails make it easy to keep internal and external stakeholders in the loop about work. Automate emails like you would any other rule, button, or command.
For example, Butler can automatically email clients when feedback is needed. Teams simply need to create a rule that sends an email whenever a team member (or Butler) moves a card to the “Needs Feedback” list.
Note
Butler has so much to offer—there’s no way to fit it all into a single article. Check out Trello’s extensive Butler help documentation if you wish to learn more tips and tricks for getting the most out of Butler.
Stay accountable with advanced checklists
Get granular with checklists by assigning due dates and members to specific subtasks. Subtasks appear in your Calendar view so you get more clarity on what lies ahead. Assigned subtasks also appear for team members in the “Your Items” section of their Trello workspace.
Keep essential data front and center with custom fields
Use custom fields to add valuable details unique to how your team works. Add dates, text, numbers, drop-down lists, and checkboxes, and label them exactly how you want.

Here are a couple of examples of how you can use custom fields:
- Gather information for software bugs. A development team can create fields to help capture important contextual information for bugs, like the type of operating system the reporting customer uses, their browser and browser version, and additional details.
- Create an end-to-end hiring process. An HR team can create fields to gain more visibility into where a candidate stands in the hiring pipeline, like whether the candidate’s portfolio was received, the applicant’s current interview stage, and whether any skills tests are necessary.
Now that you’ve got a feel for the endless possibilities of automation, you’re ready for Trello Enterprise’s next-level customizations and views.

